
White cement is a material that often gets overlooked when it comes to fixing up your home. But this material can do a lot. You can use it to fill spaces between tiles, fix cracks, and even make cool art. If there happen to exist any empty spaces among your tiles, white cement would be the perfect option for you. It’s easy to work with, budget-friendly and even comes in similar hues as those of your tiling so that they don’t look awkward when put side by side. We will guide you through filling up spaces using this type of cement from start to finish.
Step-by-Step Guide to Fill Gaps with White Cement
Step 1: Preparation
- Clean the Area: Start by vacuuming up dirt from the cracks among the panels or tiles. A chisel or blade will help you get rid of all accumulated dirt, dust or even remnants of aged grouts, but be careful to avoid scratches. This helps the cement stick well to the surfaces.
- Protect Surrounding Areas: Put masking tape on areas next to the gaps you’ll fill. This stops accidental spills on the tiles or other surfaces.
Step 2: Mixing the Cement
- Mix the Paste: Mix white cement with water until it forms a consistent smooth mixture. The mixed cement should have a consistency similar to ground peanuts not too watery and neither should it be in any way solidified.
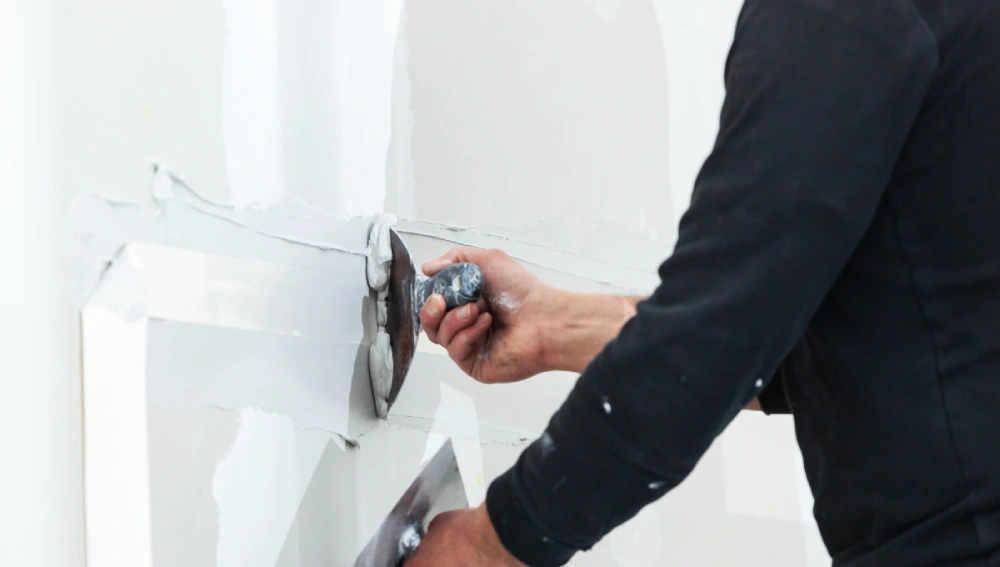
Step 3: Putting on the Cement
- Fill the Spaces: Apply the cement into the gaps using a putty knife or margin trowel. Press hard to make sure the cement fills the entire gap and sticks well to the tile edges.
- Get Rid of Air Pockets: Tap the filled gaps with the flat side of the knife. This helps to remove any trapped air ensuring a solid fill and avoiding future cracks.
Step 4: Smoothing and Cleaning
- Make It Smooth: When you are done stuffing in all those cracks, use a putty knife to level out your cement surface. Make sure it’s level with the tiles.
- Remove Extra Cement: Right away, wipe off any extra cement from the tile surfaces with a damp sponge or cloth. This stops the cement from hardening on the tiles and becoming difficult to clean later.
Step 5: Curing
- Let It Dry: Give the cement at least 24 hours to dry. Keep the area undisturbed during this time to allow the cement to set. You can use a fan to help it dry faster if needed.
Step 6: Final Touches
- Check the Work: After the cement dries look at the filled gaps to spot any flaws. Sand any bumpy areas if you need a smooth surface.
- Protect the Surface: To make it last longer and resist water better, think about putting a sealant over the filled gaps.
Why Use White Cement?
White cement offers several benefits that make it a top pick for filling gaps:
- Looks Good: Its colour can mix well with white tiles or blend with dyes to match other shades.
- Toughness: Just like regular cement, white cement lasts long and creates a solid bond.
- Flexibility: You can use it for many jobs besides filling cracks and gaps, like plastering and finishing surfaces.
- Toughness: It stands up well to weather, so you can use it inside and outside.
Things you need
Before you start plugging holes with white cement, get these tools and materials:
- White Cement: You can buy it with or without sand mixed in.
- Mixing Container: To make the cement paste.
- Putty Knife or Small Trowel: To push the cement into the gaps.
- Sponge or Wet Cloth: To wipe off extra cement from the tiles.
- Gloves: To keep your hands safe while you work.
- Water: To mix with the cement and clean.
Advice for Using White Cement
- Weather Conditions: Work when it’s not too hot or cold. This helps the cement dry at the right speed, which affects how it turns out.
- Adding Colour: During preparation, incorporate colouring pigments into the white cement to blend it up with shades of coloured tiles. Before applying over an area, remember to do a patch test for approval first.
- Safety Precautions: While working on concrete use gloves so that your hands are protected. In addition, if necessary, wear a mask for safety from inhalation of cement powder.
Common Mistakes to Avoid
- Poor Cleaning: Gaps that aren’t cleaned well can cause the cement to stick and crack later.
- Wrong Mixing: Using the incorrect amount of water to cement can make the mix weak. Read and follow what the instruction says to get the best results.
- Too Much Filling: If you fill past the top of the tiles, you might end up with bumpy surfaces once the cement dries.
Alternative to white cement You Can use in the gaps ?
When filling gaps between tiles, white cement is commonly used due to its smooth finish and ability to blend well with light-colored tiles. However, there are several alternatives available, each with specific benefits depending on your project requirements, such as durability, moisture resistance, or aesthetic preferences.
- Grout
- Epoxy Grout
- Polymer-Based Tile Adhesive
- Silicone Sealant
- Cement-based Tile Adhesive
Differance between White Cement and Rest
| Property | White Cement | Grout | Epoxy Grout | Polymer-Based Tile Adhesive |
| Composition | A blend of white cement and fillers | Mixture of cement, sand, and water | Epoxy resins and hardeners | Polymer modified cement and adhesive compounds |
| Strength | Moderate, not as strong as grout or epoxy | Moderate, with sanded grout being stronger than unsanded | Very high, resistant to cracking and stains | High bonding strength, ideal for demanding installations |
| Water Resistance | Moderate, may not be fully water-resistant | Standard grout is not waterproof, but improved with sealers | Excellent, highly resistant to moisture and stains | Good water resistance, especially in moist environments |
| Durability | Less durable than epoxy or adhesive | Durable, but may crack over time | Extremely durable, long-lasting in high-traffic areas | Durable and flexible, but can degrade under extreme conditions |
| Ease of Use | Easy to apply, but may require skill for smooth finish | Easy to apply, may require sealing for better durability | Requires careful mixing and application | Easy to apply with a trowel, highly adhesive |
| Use Case | Filling gaps in non-moisture-prone areas | Common for standard tile installations in dry areas | Best for high-traffic, moisture-prone, or commercial areas | Ideal for areas with heavy-duty bonding requirements |
| Appearance | Smooth, white finish that blends with light-colored tiles | Varies by grout type (sanded for wider gaps, unsanded for narrow) | Available in a range of colors, glossy finish | Generally matches tile adhesive colors, less aesthetic |
| Cost | Generally cheaper than epoxy grout | Affordable, especially for unsanded | Expensive due to high durability and chemical properties | Mid-range cost depending on polymer quality |
To wrap up
Using white cement to fill gaps between tiles works well and looks good too. If you follow the steps in this article, you can get results that look professional without much work. Whether you’re fixing old gaps or setting up new tiles, white cement is a good choice that keeps your surfaces smooth and strong.
FAQs
White cement works well in wet spaces like bathrooms and kitchens because it repels water. Make sure to seal it to boost its performance.
White cement takes 24 to 48 hours to dry. This depends on how thick you apply it and the conditions around it. Don’t touch the area while it’s drying to let it set right.
White cement stands up to the weather and fits well for outdoor use. You can use it to fill gaps in patios, walkways, and garden tiles.
While white cement lasts long, keep in mind that it differs from grout, which is made to fill tile gaps. White cement can work as an option when grout isn’t around or doesn’t fit the job.
To fill gaps between tiles with white cement, mix the cement with water to form a paste. Use a grout float or rubber spatula to apply the mixture into the gaps, ensuring it’s evenly spread. Once applied, smooth the surface with a damp sponge and allow it to set before cleaning excess cement.
White cement typically takes about 24 to 48 hours to fully dry, depending on the thickness of the application and environmental conditions. However, it may set enough for light handling in 3-4 hours. It’s important to allow it to cure for a longer period to achieve maximum strength and durability.